This is intended to be a brief introduction to the GNU build system (Autotools) for beginners. The reader is assumed to have a basic understanding of the process of compilation and linking.
Outline
What is a build system? ⇡
Running the compiler and linker by hand can be a tedious chore when there are numerous files, as is typical in large projects. This is where the build system comes in – it automates the workflow to aid the developers as well as the the users in the process of building software. The process can be roughly divided into three stages:
- configuration: adapting the build process to the target system;
- compilation and linking: translating source code into machine code;
- installation: copying the final product to its final location.
Build systems assist in some or all of these steps.
What is Autotools? ⇡
Build systems come in all shapes and varieties. For this article we focus on the GNU build system, also known as Autotools, which is one of the oldest build systems and remains quite popular on Unix-like platforms.
An easy way to tell if the project uses Autotools is to look for the presence for its primary input files:
configure.ac, andMakefile.am.
Note that Autotools is not a monolithic build system. Rather, it is more like a collection of different tools that work together to help build a project. Of these tools, the two most critical ones are:
Autoconf is a tool that generates a configure script for the configuration step. The script detects the available features of the target system and adjusts the build process where needed. The script is written in the shell language, but in a somewhat unusual way to maximize portability across different platforms. It is automatically generated from the input file (configure.ac) via the m4 macro language.
Automake is a tool that aids in the construction of makefiles. It consumes input files (Makefile.am) to generate makefile precursors, known as Makefile.in. These precursors are later consumed by the configure script to construct the complete makefiles, which may then be used to build and install the program.
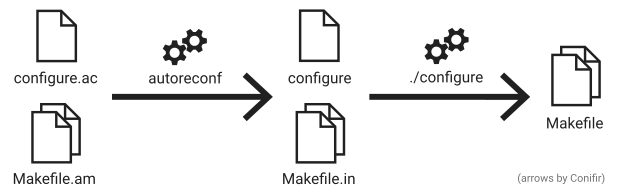
Here is a highly simplified sketch of the typical Autotools workflow:
(A more detailed diagram as well as description be found on Wikipedia.)
Initially, the developer runs
autoreconfto generate theconfigurescript fromconfigure.acand aMakefile.infrom everyMakefile.am(of which there may be several, hidden in the subdirectories):autoreconf -i
Afterwards, the user runs
./configureto generate aMakefilefrom everyMakefile.in../configure
Generally, when the user downloads a package, step 1 has already been done, hence the user only needs to run the configure script. The user does not need to invoke autoreconf unless the configure script is absent.
If you are interested in learning how to use Autotools in your own projects, consider reading the official docs or one of the many Autotools tutorials.
How do I build programs that use Autotools? ⇡
First, make sure you have changed the working directory to the project directory that contains the configure script.
Next, skim through the README and/or INSTALL documents to make sure that any required dependencies are installed. Note that if the dependencies are installed in an unusual location you may need to adjust the search paths for
- executables (
PATH), - headers (
C_INCLUDE_PATHand/orCPLUS_INCLUDE_PATH), and/or - libraries (
LIBRARY_PATH).
This must be done before running configure (the next step), otherwise it may fail or link against the wrong library.
Finally, you can then build the program by following the traditional 3-step procedure:
./configure
make
make install
However, sometimes this fails, or perhaps, the default configuration is not what you want.
What should I do if ./configure fails? ⇡
The first thing to do is to look for the same error message in config.log. Just above the error message there will be a record of the last few actions configure tried to do but failed.
Most of the steps in a configure script are feature tests: they typically run a test program to find out if some feature is available and whether it has any specific quirks. If a test fails and there is no fallback plan, then the entire configure script is aborted. There will usually be an error message associated with this (e.g. a compiler error) but it is buried inside config.log.
Sometimes the reasons are not obvious, or the configure script may even give misleading reasons! Therefore, always dig into the log to uncover the true cause. It could be an improperly set environment variable, a missing library/tool, or a flag that needs to be overriden, etc.
In the worst case, the configure.ac may have been faulty and as result you may have to debug the configure script itself.
How do I customize configuration process? ⇡
To see what customizations are available, run
./configure --helpThe options available will vary from project to project, so read it carefully. In my experience, the two most commonly used flags are:
–prefix=/some/path: sets the path to which the project will be installed. If not provided, the default is/usr/local, which means- executables are installed to
/usr/local/bin, - libraries are installed to
/usr/local/lib, - manuals are installed to
/usr/local/man, and - additional files are installed to
/usr/local/share.
A commonly used alternative is the
$HOMEdirectory, useful if you don’t have superuser privileges.- executables are installed to
–with-somepackage=someflags: overrides the linker flag(s) used for somepackage. This is useful if you want to use a substitute library that the script is not aware of. Be sure to quote the argument if it contains special characters or consists of more than one flag.For example, if a project expects the BLAS library and you wish to use Intel MKL instead, you can specify
--with-blas=-lmkl_rt.
Show Disqus comments
comments powered by Disqus